How To Play Banjo: A Beginners Guide to Clawhammer

So you’ve decided to pick up the 5-string wonder known as the banjo! Whether you’re cosplaying Kermit the Frog or simply wanting to jam on some tunes with your pals in a barn, the banjo is a fun instrument to pick up and learn to play. This blog will explain an introduction to a basic banjo rhythm and picking pattern to get you on your way to the bayou.
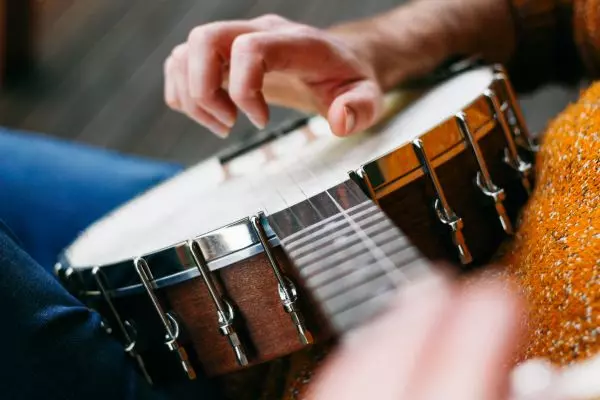
The Parts of a Banjo
|
To begin, we should familiarize ourselves with the instrument's parts. The banjo has its roots in West African stringed instruments such as the kora or akonting, dating back to the 17th century. If we take a look at this handy diagram below, we can see that the banjo shares a lot of the same features as an Acoustic Guitar, the main difference being that the banjo, of course, implements a round drum head and 5 strings to create its signature plucky percussive sound. This is important to remember, as the banjo is primarily a stringed instrument; the rhythm it creates while playing is a big part of its sound, with the fingers' brushing creating a snare drum-like effect. |
|

Two Types of Banjos: Open-Back & Resonator
There are two types of banjos you’ll typically see in the wild: open back (sometimes called “old time”) banjos and resonator banjos.
Open-Back Banjos
Open-back banjos are, as the name suggests, an “open back” design in which the drum head is not sealed or closed behind the head. It is similar to a tambourine, creating a mellow, more muted sound. A big advantage of open-back banjos is their affordability, given that their construction is simpler and often less ornate than that of resonator banjos.
Resonator Banjos
Resonator (or bluegrass) banjos are “closed back”, meaning that the drum head has a shell on the back, creating a louder and clearer sound that is more associated with plucking and bluegrass playing. Resonator banjos are typically more expensive and heavier than open-backs due to added components, but the advantage is that they offer a large, bright sound.
Banjo Pricing
Brands like Deering, Gold Tone, and Epiphone are just a few examples of companies that make great banjos at affordable prices. These banjos start anywhere from $250-$500 for entry-level instruments.
On the lower end, these include the Epiphone MB-100 ($369.99) and Denver DJB5C ($429.99) and intermediate instruments like the Gold Tone CC-50 and Deering Goodtime Deco are priced at $629.99 and $825, respectively.
Getting Started With the Banjo
Tuning A Banjo
The most common banjo tuning is Open G, which creates, you guessed it, a G chord when strumming the strings open. From top to bottom with the thinnest string first, tune your strings to G, D, G, B, and lastly D. Remember the acronym “Good Dogs Give Boys Donuts”, or another phrase that helps you remember the strings.
Tune your strings by plucking them individually and raising or lowering the pitch using the tuning pegs to match the strings as I described. Now that we’re in tune, let’s familiarize ourselves with hand positioning.
Resting the banjo on your non-dominant knee, place your picking hand over the strings, almost pointing towards the neck of the banjo, so your arm is in an L shape. You can then hold the neck of the banjo in your other hand.
The “Clawhammer” Technique
The “clawhammer” is a style of banjo playing, also called overhand, down-picking, or frailing. Clawhammer style consists of a combination of brushing and plucking motions with the right hand in what looks like a “claw” shape, “hammering” towards the banjo and back, as opposed to strumming up and down, like on guitar.
This contrasts with what’s known as bluegrass or “Scruggs” style, in which the player uses finger and thumb picks that create a “rolling” motion through a fast picking pattern. The next section will explain in more detail how to play the clawhammer technique.
Playing the Banjo
Now, let’s get to playing! We’re going to tackle the basic clawhammer rhythm, consisting of a pluck, a strum (or brush), and another pluck.
Starting Hand Position
Start by choosing a finger, either your index (pointer) or middle finger and, forming your right hand into a claw or C shape, strike the string furthest away from you.
Your “starting” position should always involve your hand resting on the strings, with the flesh of your thumb resting on the highest/thinnest G string, and the other four fingers resting above the rest of the strings in that “claw” C shape.
Strumming the Strings
Every time you strike or make a movement or strum or pluck, your thumb should always be “going back home,” so to speak. Think of this motion as the same one you make when you knock on a door.
Next, after striking that high D string and coming back to home base, pluck that thinnest high G string with your thumb. The idea is to make a more “pulling away” motion with your thumb, not necessarily a pluck.
This is sort of the opposite idea of playing guitar, where the motion is up/down; the banjo is towards/away. Now try again, heading “toward” the strings to pluck/strike that D string and after hitting home plate, pull the high G string with your thumb.
Brushing the Strings
The last part of this process is the “brush” or strum. It sits between the pluck and pulling away, to create something like this: Pluck/strike (high D string) -> Brush through the strings -> “pull” the high G string with your thumb.
The pattern this creates is sometimes called a “bum dee dee” rhythm, and it’s confusing at first, but as you practice slowly and start to pick up speed, it will resemble songs you’ve heard in bluegrass/folk/country music.
Try to get your notes sounding as crisp and clear as possible, but don’t rush this part of the process. Hit that high D string over and over using a metronome on a slow setting between 40-60bpm (that’s Largo for you classical nerds), and continue until you feel comfortable.
This saying has never been truer: “Practice slow, to learn fast”.
Banjo Lessons Are Available
If you find yourself struggling to teach yourself online, or you’re more of a visual learner and need a teacher to guide you, you can connect with your local Long & McQuade store for banjo instructors in your area to take banjo lessons. Our knowledgeable teachers can accommodate your schedule and create a plan custom-tailored to your skill level. Banjo lessons are open to all students of all ages.
Purchasing or Renting a Banjo
Long & McQuade sells a variety of banjos suitable for all skill levels, from beginners to experienced professionals. We also offer banjo rentals with a daily, weekly, or monthly rental period for those who may want to try out the instrument before committing without breaking the bank.
That’s it for our introduction to clawhammer banjo playing. You know the layout of the instrument, a bit of history, and how to play the basic clawhammer pattern. Keep it up, and you’ll be jamming with Pete Seeger in no time!