")
Understanding Signal Flows in a Mixing Console

Image credits by Producer Hive
When I first started working with a mixing console, the concept of signal flow felt a bit overwhelming. All the knobs, buttons, and faders seemed complicated, but once I learned how the audio signal actually moves through the mixer, everything started to make a lot more sense.
Now, understanding signal flow has become second nature—and I believe every sound engineer or musician should grasp it early on.
Let me walk you through how I understand the signal flow in a typical mixing console, from the moment sound enters the board to when it reaches the speakers.
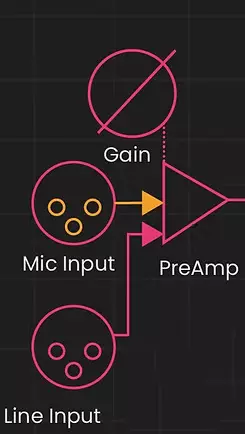
1. It All Starts at the Input
Every sound begins at the input stage. I usually connect microphones or instruments through XLR or 1/4" TRS jacks on the mixer. If it’s a mic signal, it’s too weak on its own, so it goes straight into the mic preamp, which boosts it up to a workable level (line level).
To control this, I adjust the gain (or trim) knob. This sets how much the preamp boosts the signal. I’ve learned the hard way that if I set the gain too high, the signal clips and distorts. Too low, and the sound is too weak. Finding the sweet spot is key.
2. Insert point and Direct out
After the gain stage, the signal passes to the console's Insert point. Here, the signal can be sent to external outboard gear, such as EQs, Compressors, or other signal processors. If the cable is patched at the insert point, the internal signal path breaks, and the signal is SEND to the outboard gears. Once processed, the signal comes back as a RETURN signal and is routed forward in the signal chain.
Some mixers also have direct outs, which let me send individual channels straight to a recorder or audio interface.
Some mixers I’ve used have a high-pass filter, which I switch on when I want to cut low-end rumble, like stage vibrations or wind noise. There’s also sometimes a pad button, which I use if the input signal is too hot (especially from active instruments or certain mics). It knocks the level down by a set number of decibels to prevent distortion.

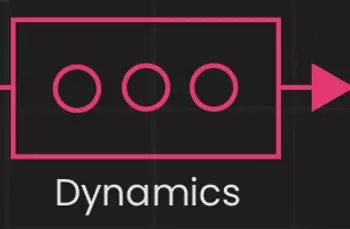
3. Shaping the Sound with EQ/Dynamics
Next, the signal passes through the EQ/Dynamic section. I really enjoy this part because it lets me sculpt the sound. If a vocal sounds too boomy, I roll off some low frequencies. If a snare drum isn’t cutting through, I boost the high mids. Some mixers offer simple 3-band EQs, while others have full parametric control.
Tweaking the EQ is where a lot of the tone shaping happens, and it makes a big difference in the final mix. Also, balancing your input signal with onboard dynamic processors makes a big difference, as the signal's gain is already optimized before it reaches the channel fader.
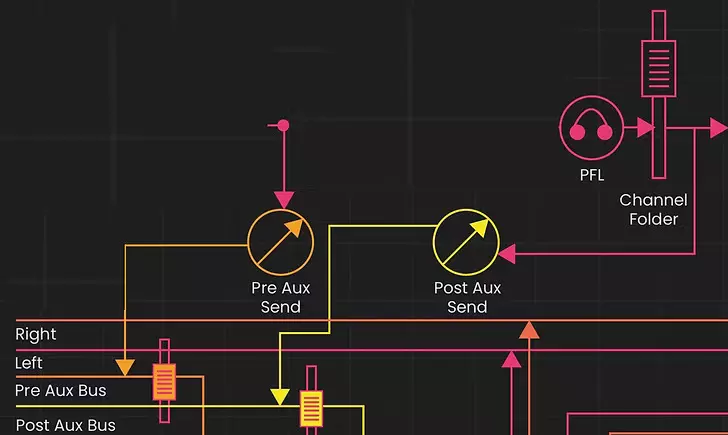
4. Sending to Aux Buses
After EQ/Dynamics, the signal hits the auxiliary sends (aux sends). I use these to create separate mixes—usually monitor mixes for performers, or to send signals to external effects like reverb or delay.
I’ve learned the difference between pre-fader and post-fader aux sends:
- Pre-fader sends aren’t affected by the channel’s volume fader—great for monitor mixes.
- Post-fader sends follow the fader level—perfect for effects so that reverb levels adjust with the main signal.
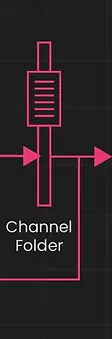
5. Controlling Volume with the Fader
Once everything is shaped and placed, the signal goes to the channel fader. This is where I control the overall volume of that channel in the mix.
During a live show or recording, I ride the faders to make sure everything sits just right in the mix. It’s probably the most interactive part of mixing, and I really enjoy the hands-on control.
6. Positioning with Pan and controlling the Mute button
Then comes the pan knob. For mono channels, this lets me place the sound in the stereo field—left, right, or center. If I’m mixing drums, I might pan the hi-hat slightly left and the floor tom slightly right, for example. Stereo channels usually have a balance control instead.
After the Pan knob, the Mute button follows, which, if engaged, cuts the signal from further flowing, which in turn affects the whole mix.

7. Routing the Signal
After the fader, I can route the signal to different outputs:
- Most commonly, I send it to the main mix (left/right).
- Sometimes, I assign channels to groups or submixes—like grouping all the drums together so I can control them with one fader.
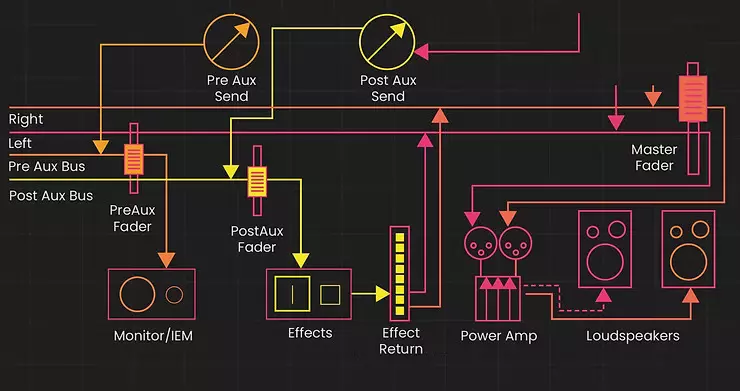
8. The Master Section
Finally, everything goes through the master section. Here, I control the overall mix with the main faders, and this is what gets sent to the speakers, recording device, or broadcast system.
Some mixers also let me return effects here, monitor different outputs, or control headphone levels. It's the last stop before the sound hits the audience—or the hard drive.
My Thoughts on Digital Mixers
I’ve worked on Analog mixers, Digital mixers, and Hybrid mixers, and while the signal flow is conceptually the same, there’s way more flexibility on Digital Mixers. Routing is often done via menus, and effects and processing are built right in. I like being able to save and recall scenes—it’s a huge time-saver. But I still think it’s important to understand the signal flow underneath it all.
Why Signal Flow Matters to Me
Learning how signal flows through a mixing console helped me troubleshoot problems faster, build cleaner mixes, and communicate better with other engineers. Whether I’m working a live gig, recording a podcast, or mixing in a studio, this knowledge gives me confidence and control.
Once I understood where the signal starts, where it goes, and how it gets there, the mixer stopped being a confusing panel of knobs and faders—and became a powerful creative tool.